
Bathrooms and wet areas/Global
Bathroom waterproofing under tiles, and how to flood test it
Which membrane to use, how high to take it, how to seal corners, pipes and the drain, how thick and how long to cure, and how to run a 24-hour flood test.
Bathroom waterproofing is one unbroken layer under the tile adhesive. It covers the whole shower floor and the shower walls to at least 1.8 m, the rest of the wet floor, every joint between floor and wall, every pipe and the drain. Everything comes from one manufacturer's system: membrane, bands, corners, pipe collars and the drain piece. It goes on at the thickness on the data sheet, in two coats or in overlapped sheets. Then it cures, and you prove it by flooding the floor for at least 24 hours. Only then do the tiles go on.
In most renovations the tiler or a waterproofing applicator does this, not the owner. Your part is to agree three things before work starts: which system goes on, how high, and that there will be a flood test before tiling. Then look at the membrane before the tiles hide it, and be there, or get photos, at the start and end of the flood test. The checklist below is written for that visit.
#Which membrane: liquid, sheet or board
All three work if they are installed the way the maker says. The choice comes down to the surface you are covering, how much time you have, and how easily you can check the thickness. On most renovations the tiler rolls on a liquid membrane.
| Type | What it is | Thickness | Good at | Where it goes wrong |
|---|---|---|---|---|
| Liquid, ready-mixed (EN 14891 class DM) | Polymer paste, rolled or brushed on | 0.5–0.8 mm cured for HYDRO BAN; 2 coats of about 0.4 mm for Mapelastic AquaDefense | No seams, follows any shape | Thickness depends on the person applying it; slow to cure in cold, damp rooms |
| Liquid, cement-based (class CM) | Polymer liquid mixed with cement powder on site | At least 0.8 mm dry in two coats; at least 2 mm when trowelled (ARDEX 8+9) | Trowelled, it also evens out small bumps | Wrong mix or wrong thickness |
| Sheet | Thin polyethylene sheet with fleece, laid in tile adhesive | 0.2 mm (Schlüter-KERDI) | Thickness fixed in the factory | Every seam is done by hand: at least 5 cm overlap, or a band over a butt joint |
| Board | Waterproof foam-core boards that also line the walls | Per system | Flat walls and waterproofing in one go | Joints, screw heads and corners still need the system's band and sealant |
EN 14891 is the European standard for liquid membranes under tiles. The letters on the tub tell you what is inside: CM is cement-based, DM is a ready-mixed dispersion, RM is a reaction resin. O1 and O2 mean it still bridges cracks at −5 °C and −20 °C. P means it resists chlorinated water, which matters in a pool, not a bathroom. The North American equivalent is ANSI A118.10. HYDRO BAN, for example, is declared to both.
Do not mix brands in one layer. Bands, corners, collars and drain flanges are tested with their own membrane and adhesive. Mix them and you are outside the tested system, usually outside the warranty, with untested parts at the weakest points.
#Where the membrane goes
There is no single world rule. The most detailed published one is Australia's building code, which we use here as a benchmark. The Dubai Building Code sets minimum heights for hard, non-absorbent finishes such as tiles, and taking the membrane under them at least as high is sensible.
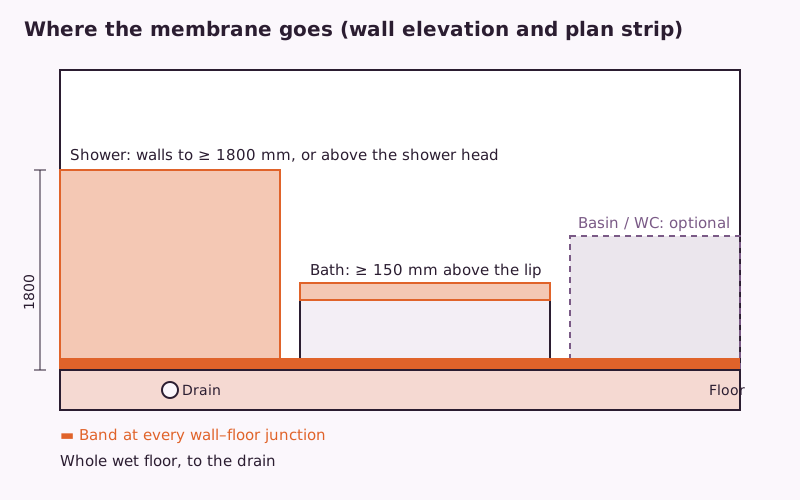
| Where | What to cover |
|---|---|
| Shower floor, including any kerb or step | All of it |
| Shower walls | At least 1800 mm above the floor base; in Dubai, at least 1800 mm above the drain. If the shower head is higher, going above it costs almost nothing |
| Corners and wall joints in the shower | 40 mm each side of the joint |
| Floor–wall joints across the room | Every one, with a band turned up the wall; the Dubai code wants a hard, non-absorbent base at least 100 mm high |
| Walk-in shower without a screen | A waterstop at least 1500 mm from the shower head; the floor inside it counts as shower. Waterproofing the whole floor covers this |
| Bath within 75 mm of a wall, no shower over it | Protect the wall to at least 150 mm above the bath; for a built-in bath, membrane to 150 mm above the rim and a waterstop under the rim |
| Walls near the basin and WC | Dubai wants a moisture-proof, non-absorbent finish to 1200 mm within 600 mm of fittings; a membrane there is optional but cheap |
| Rest of the bathroom floor | Water-resistant on concrete or fibre-cement, fully waterproof on a timber base |
A rule from practice: if the room has a floor drain, waterproof the whole floor and turn it up every wall. It costs little and stops the most common leak, water creeping under the door threshold or along a wall into the next room.
#Preparing the surface
- Slope first. The membrane follows the surface under it, so build the fall to the drain in the screed, not in the tile adhesive. Australia's code sets falls of 1:80 to 1:50. The Dubai code limits the slope in an accessible shower to 4 %.
- Cured and dry. For HYDRO BAN, LATICRETE wants fresh cement mortar left 72 hours at 21 °C and concrete moisture no higher than 3 %. Mapei wants under 3 % moisture in a cement screed for Mapelastic AquaDefense.
- Sound, clean and flat. Get rid of loose surface skin, dust, oil, wax and sealers. Fill holes and hollows with a repair mortar that suits the system.
- A surface the maker accepts. Concrete, cement screed, cement render, cement board and, indoors, plasterboard are the usual ones. HYDRO BAN cannot go on OSB, chipboard or plywood made with interior glue. Board choice is covered in drywall board types.
- Prime if the data sheet says so. Absorbent surfaces often need a primer or a thinned first coat; for HYDRO BAN that is 1 part membrane to 4 parts water.
- Pipes and drain fixed first. Do not start until every pipe outlet, mixer body and the drain are fixed in their final place and the pipes have been pressure tested.
#Corners, pipes and the drain
Most leaks start at the details, not in the middle of the membrane.
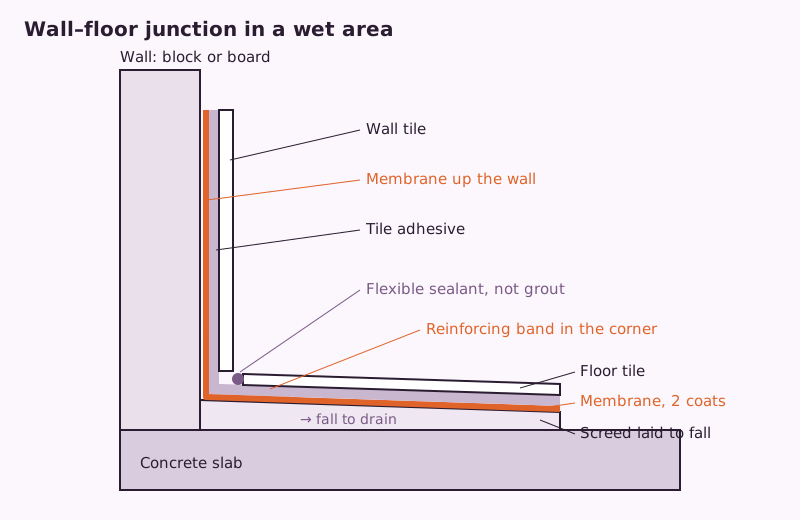
- Floor–wall and wall–wall corners. Press a reinforcing band into the first coat while it is wet, or into the system adhesive if you use sheet. Mapei puts its band in every corner before the first coat. ARDEX uses a 120 mm mesh tape at corners and wherever a surface changes direction. Ready-made inside and outside corner pieces save you folding corners that later leak.
- Pipes through the wall or floor. Use the system's pipe collar, a stretchy sleeve with a membrane flange, set into the membrane. A ring of sealant round a pipe is not waterproofing. Australia's code also expects tap bodies to come out for service without breaking the seal.
- The drain. The membrane has to bond onto the drain's flange or clamping ring, not stop just short of it. Schlüter bonds a 50 × 50 cm piece of its sheet onto the drain flange. ARDEX sets a mesh piece round the drain in the first coat. Drains made for bonded waterproofing are the safest. The Dubai code also wants a waterproof seal between the floor finish and the edge of the drain grating.
- Niches, brackets and screws. Waterproof the inside of a niche like a small shower. Seal anything screwed through, such as screen brackets and grab bars, ideally with timber or metal backing behind the board.
#Applying it: coats, thickness, drying
- Bands and collars first, set into fresh membrane or the system adhesive.
- First coat over the whole area with a roller, brush or trowel, overlapping the bands.
- Wait until it is dry. Mapelastic AquaDefense needs about 1 hour at 23 °C. HYDRO BAN must be fully cured; you can see it change from light green to olive.
- Second coat across the first. Mapei, ARDEX and LATICRETE all ask for it at right angles to the first.
- Check the thickness with a wet-film gauge as you go, and compare how much you used per m². HYDRO BAN needs 0.4–0.6 mm wet per coat and about 0.95 kg/m² for two coats. Mapelastic AquaDefense uses about 1 kg/m² for two coats. ARDEX 8+9 needs at least 0.8 mm dry in total.
- Cure, test, then tile. Stay inside the temperature range: +5 to +35 °C for Mapelastic AquaDefense. Do not leave it bare for long; HYDRO BAN must not sit exposed to sun or weather for more than 30 days.
| Product | Coats | Between coats | Earliest flood test | Earliest tiling |
|---|---|---|---|---|
| HYDRO BAN (DM) | 2 | Until the first is fully cured (olive colour; about 45–90 min at 21 °C when sprayed) | About 2 h after full cure at 21 °C or more; full cure usually 24 h at 10–21 °C | About 2 h after the last coat at 21 °C and 50 % humidity; longer if cold or damp |
| Mapelastic AquaDefense (DM) | 2 of about 0.4 mm | About 1 h at 23 °C | Not given; a 1 mm layer is fully dry after 12 h | 3–4 h after the second coat |
| ARDEX 8+9 (CM) | 2, at right angles | 30–45 min | At least 4 h after the last coat | About 1 h after the last coat |
These times hold at the conditions on each data sheet, 21–23 °C and 50 % humidity. In a cold or damp room everything takes longer. Read the current sheet for your product.
Never flood test or tile over a liquid membrane that has not cured as long as the maker says. A soft membrane gets punctured or washed off, and the test proves nothing.
#The flood test
No standard sets a flood test for bathrooms as such. The closest published method is ASTM D5957, a guide written for flood testing roof terraces and car park decks with falls up to 2 %, much like a bathroom floor. It uses at least 25 mm and at most 100 mm of water, for 24 to 72 hours. Treat 24 hours as the minimum unless your contract or the membrane maker says longer.
- Plug the drain with an expanding test plug, and keep debris out of the drain body.
- Dam the doorway if the threshold is lower than the water will be. A strip of board stuck down, or a bead of sealant you can peel off, does it.
- Fill with clean water to at least 25 mm at the highest point of the floor. Keep the water well below the top of the membrane at the door and the walls; the deck guide keeps it at least 50 mm below the top edge.
- Mark the level on the wall in pencil with the date and time, and photograph it with a ruler in shot.
- Check the room below and the walls next door, ceilings included, at the start, after a few hours and at the end. In a block of flats, arrange access with the neighbour or facilities management beforehand.
- Leave it 24 hours, or longer if the contract says so, then read the level again. In a hot room some water evaporates; leave a bowl of water in the same room for the same time and compare.
- Drain, let it dry, look over the membrane for damage, then tile. If it leaked, find out why, repair it the way the system says and test again.
Write a short record: dates and times, depth, level at the start and the end, who checked downstairs, photos, the product and batch numbers. It is the paper you will want if a leak ever appears.
#What goes wrong
- Too thin. One coat, or two thin coats on a thirsty surface, leaves pinholes. The flood test may pass and the membrane still fail later when the building moves.
- No band in the floor–wall corner. Walls and floors move differently, and an unreinforced corner cracks first.
- Drain not bonded in. The membrane stops at the drain body and water runs under the flange into the slab. This is the classic leak into the ceiling below.
- Sealant instead of waterproofing round pipes, mixer bodies and screen brackets.
- Fall built in the tile adhesive instead of the screed. Water sits on the membrane and the adhesive stays wet.
- Mixed brands in the system, or a tile adhesive that does not suit the membrane. Mapei, for example, asks for at least a class C2 adhesive indoors.
- Tiling before it cures, or testing too early, then puncturing it with tools and spacers.
- Hard grout in the corners. Inside corners and the edges of the tiling need a flexible sealant joint, not grout.
- Drilling through after tiling for shelves or screens without sealing the holes.
#How to check the work
- The data sheets for the membrane system are on site, and every accessory is from the same system.
- The screed falls to the drain before waterproofing, with no puddles.
- Bands in every floor–wall and wall–wall corner; ready-made pieces at inside and outside corners.
- A collar on every pipe; the membrane is bonded onto the drain flange.
- Shower walls done to at least 1.8 m or above the shower head; the floor fully covered; turned up at the door.
- Two coats, even colour, no pinholes or bare patches; the amount used roughly matches the data sheet.
- A flood test of at least 24 hours, at least 25 mm deep, with photos and a written record.
- The ceiling and walls below were checked at the start and end of the test.
- After tiling, flexible sealant, not grout, in the inside corners and round the edges.
#When to call a professional
In a flat there is almost always someone's home below, so use a waterproofing applicator or tiling contractor who works with one maker's system and will sign the flood test record. The same goes for any house bathroom with a walk-in shower or a linear drain, or one built on timber or old tiles. For unusual surfaces, ask the maker's technical service; most print a contact on the data sheet. If the test leaks and you cannot find where, stop. Once the tiles are on, every repair starts with taking them off.
Write the membrane system, the heights and the flood test into the estimate before the tiler starts. In a Librae project they then sit in the version issued "For works" with a number, and that is what you check the membrane against. In the UAE, add independent quality control when you order the renovation through Librae, and a specialist sees the membrane and the flood test with their own eyes before tiling.
#In the UAE
- The Dubai code sets finish heights. Smooth, non-absorbent finishes go to at least 1800 mm above the drain in showers and round baths, 1200 mm within 600 mm of fittings, with a 100 mm base where floor meets wall. These are rules for the finish, usually tile, not for the membrane. Taking the membrane at least that high is the simple way to match.
- Every wet room has a floor drain. The code requires a floor drain wherever there are wet fittings, with a waterproof seal at the grating edge. So bonding the membrane to the drain is not optional.
- The fan coil is often above the bathroom ceiling. The Dubai code puts fan coil units in wet areas in apartment buildings, so a leak does less damage. Its condensate drain, and a water heater if there is one up there, are separate sources of water. If you see water under a bathroom, check them before blaming the membrane.
- Apartment works need permission. The owners association, developer or facilities management usually wants a work permit for a bathroom renovation. Read their fit-out rules before work starts, and ask whether they want to watch the flood test.
- Watch the upper temperature limit. Mapelastic AquaDefense goes on at +5 to +35 °C, and ARDEX 8+9 (Austrian data sheet) at +5 to +30 °C. In summer, keep the air conditioning on so the room stays in range, and stick to the curing times.
#What the codes say
For readers who want to know where the numbers come from.
- Dubai Building Code 2021: finish heights at showers, baths and fittings and the 100 mm base, B.8.1.2; floor drains and the seal at the grating, H.6.2.4; fan coils in wet areas, H.4.3; 4 % slope in accessible showers, C.8.3.7.1.
- Australia, NCC 2022 Housing Provisions Part 10.2 (calls up AS 3740:2021): shower floor and walls, 1800 mm, 40 mm at joints, 10.2.2; floor–wall joints and the rest of the floor, 10.2.3; baths, 10.2.4; falls, 10.2.12; showers without a screen, 10.2.18; tap bodies and niches, 10.2.23.
- EN 14891:2017, the European standard for liquid membranes under tiles; EN 12004, tile adhesive classes; ANSI A118.10, the North American equivalent for membranes.
- ASTM D5957, the guide to flood testing horizontal waterproofing. The depth and time figures come from Intertek's summary; we did not read the standard itself.
This guide explains good practice and cites the documents listed below. It is not a permit, a design approval or an engineering opinion. Work on electrical, gas, fire-safety and structural elements must be carried out by licensed professionals and approved by the relevant authority.
Sources
- Dubai Building Code 2021, Part B, B.8.1.2 Sanitary finishes; Part H, H.4.3 and H.6.2.4; Part C, C.8.3.7.1 — Finish heights at showers, baths and fixtures (PDF p. 99), FCU location in wet areas (p. 565), floor drains and seal at the grating (p. 608), 4 % maximum slope in accessible showers.
- NCC 2022 Housing Provisions, Part 10.2 Wet area waterproofing (ABCB, Australia; calls up AS 3740:2021) — Extents used as the clearest published benchmark — shower walls to 1800 mm, junctions 40 mm each side, floors outside the shower, baths 150 mm above the vessel or lip, falls 1:80–1:50, unenclosed showers, tap spindle housings.
- EN 14891:2017 Liquid-applied water impermeable products for use beneath ceramic tiling (CEN), catalogue entry — Scope and classification codes CM, DM, RM, O1, O2, P.
- LATICRETE HYDRO BAN product data sheet DS-6630-1023 (LATICRETE Europe) — Dispersion membrane example — thickness, coats, cure, substrate moisture, primer, flood-test timing, limitations.
- MAPEI Mapelastic AquaDefense technical data sheet 2103-10-2023 — Second dispersion example — 2 × 0.4 mm coats, bands at fillets, tile adhesive class, drying times, crack bridging, old tiles as substrate.
- ARDEX 8+9 technical data (ARDEX Americas) and ARDEX 8+9 Dichtmasse data sheet (ARDEX Austria) — Cementitious two-component example — total thickness at least 0.8 mm dry, coats at 90°, 120 mm mesh at drains and changes of plane, flood test at least 4 h after the final coat; application +5 to +30 °C (Austrian sheet).
- Schlüter-KERDI data sheet 8.1 (Schlüter-Systems) — Sheet membrane example — 0.2 mm sheet, 5 cm overlaps or butt joint with band, notched trowel, corners, pipe collars, drain connection piece.
- ASTM D5957-98(2021) Standard Guide for Flood Testing Horizontal Waterproofing Installations — Scope — flood testing of horizontal waterproofing on decks, water head not more than 100 mm.
- Intertek, summary of ASTM D5957-98 (test method overview) — Secondary summary of the guide — at least 25 mm cover, at most 100 mm at the lowest point, 24 to 72 hours, water at least 50 mm below flashing edges, slopes up to 2 %.