
Inspection and handover/Global · UAE
Checking finished tiling: hollow tiles, lippage, flatness and grout
How to accept a tiling job yourself — tapping for hollows, steps between tiles, flatness under a 2 m straightedge, joints, grout and sealant, with UK and US limits.
You can accept a tiling job yourself with a 2 m straight rule, a torch and something hard to tap with. Check four things: tiles that sound hollow, steps between neighbouring tiles (lippage), flatness over the whole surface, and the joints with their grout and sealant. Do it after the grout has cured and before the last payment.
Rule of thumb for the numbers: measure against the rulebook your contract names, and only that one. If it names none, agree one in writing before tiling starts. The limits are in the table; the sections below show how to measure.
#The limits
| Check | UK specification (NBS M40) | US (ANSI A108) |
|---|---|---|
| Flatness | 2 m straightedge on 3 mm feet: gap 0–6 mm (±3 mm), no sudden steps | — |
| Lippage, joint under 6 mm | 1 mm | Floor tiles: 0.8 mm + the tile's own bow. Thin gauged porcelain: 0.8 mm |
| Lippage, joint 6 mm and wider | 2 mm | Floor tiles: 1.5 mm + the tile's own bow. Thin gauged porcelain: 0.8 mm |
| Floors falling to a drain | — | Lippage table does not apply |
| Adhesive contact | Solid bed on floors; 100% without voids in showers and wet rooms (Tile Association) | 80% dry areas, 95% wet and exterior |
| Hollow tiles | No number | No number |
#When to check
- After the grout has cured, so tapping and walking do no harm. Cure times by grout type are in tile grout.
- Before skirting, furniture and sanitaryware go in, if you can. A hollow tile under a fitted vanity is hard to fix.
- Before the last payment. Write the snags down with photos and agree a date for the fixes.
#What you need
- A straight aluminium rule of about 2 m. Ask the tiler for his.
- Two 3 mm feet, for example stacked tile spacers.
- Feeler gauges, coins of known thickness or a ruler with millimetres.
- A torch held low across the floor. Light along the surface shows every step.
- Something small and hard to tap with: a key, a screwdriver handle, a steel ball.
#Hollow tiles
Tap each tile at the corners and in the middle. A well-bedded tile sounds sharp and solid. A dull, drummy sound means air under part of it.
Read the pattern, not the single tile:
- One or two slightly dull corners on a large floor are common. US practice allows 80% contact in dry areas.
- Clusters of hollow tiles, or a whole area that sounds different, point to a bonding problem.
- Hollow tiles that move, or with cracked grout round them, are the real warning signs. The US tile consultant Donato Pompo notes that whole floors rarely debond without such symptoms.
- In a shower, any hollow tile goes on the snag list: the Tile Association asks for 100% contact there.
Some floors sound lower everywhere because of what is underneath, such as an uncoupling mat or acoustic layer. Compare a suspect tile with its neighbours, not with a tile in another room.
The only way to see coverage is to lift a tile. Do that only in a dispute, with a consultant: a lifted tile usually breaks.
#Steps between tiles (lippage)
Lippage is the difference in height between the edges of two neighbouring tiles.
Lay a short straight edge across the joint, flat on the higher tile, and measure the gap above the lower tile's edge with a feeler gauge. Check where it looks worst under the torch, and along the long edges of long tiles.
The US limit adds the bow of the tiles on your floor. The US tile council's 2025 handbook reads this as the actual bow of the installed tiles, not the most the tile standard allows, according to Donato Pompo. To find it, lay a straight edge along the edge of a spare tile from the same batch and measure the gap in the middle.
Some lippage comes with the tiles. The US tile standard lets a rectified porcelain tile bow along an edge by 0.4% of its length, up to 1.3 mm. That is why long tiles laid with a half offset show steps even when the tiler did nothing wrong (see large-format porcelain floor tiles).
Glossy tiles and light from a low window make small steps look bigger. The UK specification asks for tiles and joints to look true under the final lighting, so judge in the light the room will actually have.
#Flatness
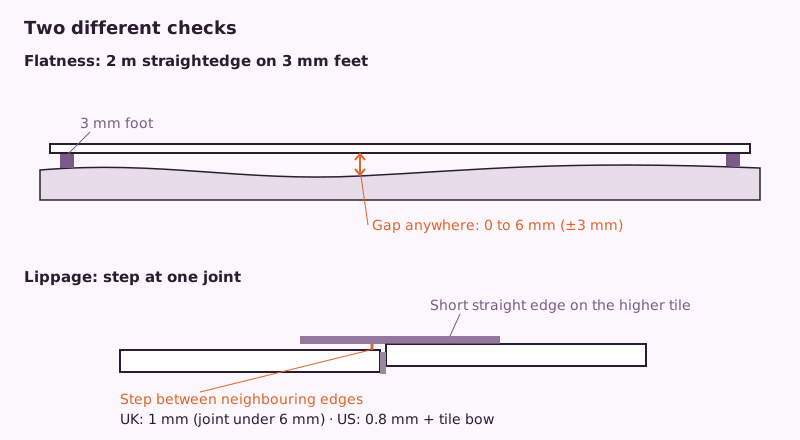
Flatness is about the whole surface, not one joint. The UK method:
- Put a 3 mm foot under each end of the 2 m straightedge.
- Lay it anywhere on the floor, in several directions.
- Measure the gap under it. It must not exceed 6 mm anywhere, and no tile may lift the straightedge off its feet.
- Look for sudden steps: none are allowed.
A spirit level is a different check. A floor can be flat and fall slightly, or level and wavy. Falls in showers are deliberate.
On walls, hold the rule vertically and horizontally the same way, and look at the corners: tiles on both sides should meet in a straight line.
#Joints
- Width. At least 3 mm on floors. Wall widths and the US brick-pattern rule are in tile grout.
- Even and straight. The UK specification asks for joints true to line, continuous and without steps. Floor and wall joints should line up where they meet, if that was the plan.
- Spacers out. Spacers left in the joint show through the grout.
#Grout and sealant
- Full joints. Grout is flush with the tile edges or slightly tooled in, without pinholes, gaps or cracks. Run a fingernail along a few metres: no soft or crumbly spots.
- Clean tile faces. No haze or film of grout.
- Even colour. Patches usually mean uneven water or early cleaning.
- Sealant where things move. Internal corners, the floor-to-wall line, round baths and shower trays, thresholds and movement joints get flexible sealant, not grout. The Tile Association lists these places, and Mapei and Custom say their grouts must not go there.
#What goes wrong
- Checking too early. Tapping and walking damage fresh grout.
- Using a spirit level for flatness. It answers a different question.
- No rulebook in the contract. Every disagreement becomes opinion against opinion.
- Judging one bad tile in isolation. Look for patterns: lines of cracked grout, clusters of hollow tiles.
- Accepting grout in the corners. It looks fine for a month, then cracks.
#When to call a professional
- Large areas of hollow tiles, tiles that move, or cracks running across several tiles.
- Water marks below a tiled shower: that is a waterproofing question, see waterproofing and the flood test.
- A disagreement about money: an independent tiling inspector can measure, lift sample tiles and report against the rulebook in your contract.
#In the UAE
The Dubai Building Code sets no tolerances for tiling flatness or lippage. The tolerance is whatever your contract or specification names, so look for a named standard there. If there is none, agree one with the contractor before tiling starts. If you hire a snagging inspector, ask which rulebook their report measures against.
The simplest place to name it is the estimate you agree. In a Librae project the standard and the limits then go into the version issued "For works" with a number, and at the end you measure against that. In the UAE, independent quality control, added to a renovation ordered through Librae, checks the base and the first tiles before the whole floor is down.
#What the codes say
For readers who want to know where the numbers come from.
- UK: the flatness method and the level-across-joints limits are the wording of NBS specification section M40, clauses 550 and 560, as printed in Norcros' 2012 tiling specification. We could not open the current BS 5385-3:2024 text itself. Coverage and movement joints come from the Tile Association's 2020 guide to BS 5385.
- US: lippage limits from ANSI A108.02 (clause 4.3.7 in the edition Laticrete quotes; section 4.4 in the 2023 edition, according to Donato Pompo), with the tile's warpage added except for gauged porcelain, as Pompo explains it. Tile warpage limits are from ANSI A137.1, as quoted by Laticrete. Coverage (80% and 95%) from the ANSI A108 installation standards, as explained by the Ceramic Tile Education Foundation.
- Hollow tiles: neither rulebook gives a percentage. The reading here follows Donato Pompo's TileLetter article (2013).
This guide explains good practice and cites the documents listed below. It is not a permit, a design approval or an engineering opinion. Work on electrical, gas, fire-safety and structural elements must be carried out by licensed professionals and approved by the relevant authority.
Sources
- Norcros tiling specification NR284-12 for Hush Acoustics (August 2012), NBS section M40 clauses 510, 530, 550, 560, 875 — UK specification wording — 2 m straightedge on 3 mm feet, no gap over 6 mm (±3 mm), no sudden irregularities; level across joints 1 mm under 6 mm and 2 mm at 6 mm and over; joints true and without steps; judged under final lighting; joints filled completely.
- Laticrete TDS 164, Lippage – Causes and Prevention — ANSI A108.02 4.3.7 lippage definition and table (0.8 mm and 1.5 mm); not for floors sloped to drains; lighting and gloss; ANSI A137.1 tile warpage.
- The Construction Specifier, Donato Pompo, Tile and stone lippage — what is acceptable (29 September 2025) — ANSI A108.02-2023 lippage limits are added to the tile's inherent warpage, except for gauged porcelain; TCNA 2025 handbook reads warpage as the actual warpage of the installed tile.
- TileLetter (NTCA), Donato Pompo, Hollow sounding tiles may signal installation problems (29 July 2013) — Hollow sound is not proof of failure; compare with surrounding tiles; tap with a hard object or drag a chain; clusters, loose or cracked tiles and grout are warning signs.
- Ceramic Tile Education Foundation, How to select the right trowel notch (updated 11 October 2022) — US coverage 80% dry, 95% wet and exterior; lifting a tile to check coverage.
- The Tile Association, Tiling Guide (2020), sections 5, 9, 10, 11 — Solid bed on floors, 100% without voids in wet areas; movement joints at corners, perimeter and thresholds, at least 6 mm; joint widths under BS 5385-1 and -3.
- Mapei Ultracolor Plus and Kerapoxy CQ, technical data sheets — Cement grout ready for use after 24 h, epoxy after 4 days; movement joints in sealant, not grout.
- Custom Building Products, Fusion Pro, TDS-242 (12 March 2024) — Ready-mixed grout — 7 days before shower use; not for changes of plane or movement joints.