
Walls, partitions and ceilings/Global
Drywall partition on metal studs: how to build it step by step
Tracks, studs at 600 mm, door openings, single and double boarding, staggered joints and screw spacing, with the numbers from Knauf, Gyproc and Siniat manuals.
A drywall partition is a steel frame with boards screwed to both sides. Tracks (UW) go on the floor and ceiling, studs (CW) stand in them at 600 or 625 mm, a door gets its own stronger framing, and the boards go on with their joints staggered and screws every 250–300 mm. Choose the stud width from the maker's height table and follow one maker's system from start to finish. Which board to use where is covered in drywall board types and metal studs.
#Before you start
- Approval. In an apartment building a new partition is a modification and usually needs the developer's or community manager's NOC first. See developer NOC for renovation.
- One system. Studs, tracks, boards and screws from one maker, built to that maker's table. Heights and sound figures hold only for the tested combination.
- Services and heavy items. Decide now where sockets, switches, a wall-hung basin, cabinets or a TV go. Each needs a fixing channel or timber blocking inside the wall, and Gyproc wants them planned before the frame goes up.
- Bathroom or kitchen side. Use moisture-resistant board there, put the studs closer where tiles go, and add a waterproofing membrane in a shower.
- Conditions. Build after plastering and screeding, with the space closed in. Board storage and humidity are covered in drywall board types.
#Which stud for which height
Height limits come from the maker's table for your exact stud, spacing and boards. These are Gyproc's Middle East figures for its GypWall CLASSIC system with studs at 600 mm. They assume the wall bends no more than 1/240 of its height under a 200 Pa push (L/240 at 200 Pa):
| Stud | Boards each side | Wall thickness | Max height |
|---|---|---|---|
| 50 mm | 1 × 12.5 mm | 77 mm | 2.5 m |
| 50 mm | 2 × 12.5 mm | 102 mm | 3.4 m |
| 70 mm | 1 × 12.5 mm | 97 mm | 3.6 m |
| 70 mm | 1 × 15 mm | 102 mm | 3.8 m |
| 100 mm | 1 × 12.5 mm | 127 mm | 4.5 m |
Other makers give other numbers: Knauf's Swiss table allows 3.20 m for a CW50 0.6 mm stud with one 12.5 mm board each side at 625 mm. Use the table of the system you buy. On Gyproc's, a 50 mm stud with single boards stops at 2.5 m, so for a 3 m wall from slab to slab go to 70 mm studs or double boards.
#Step by step
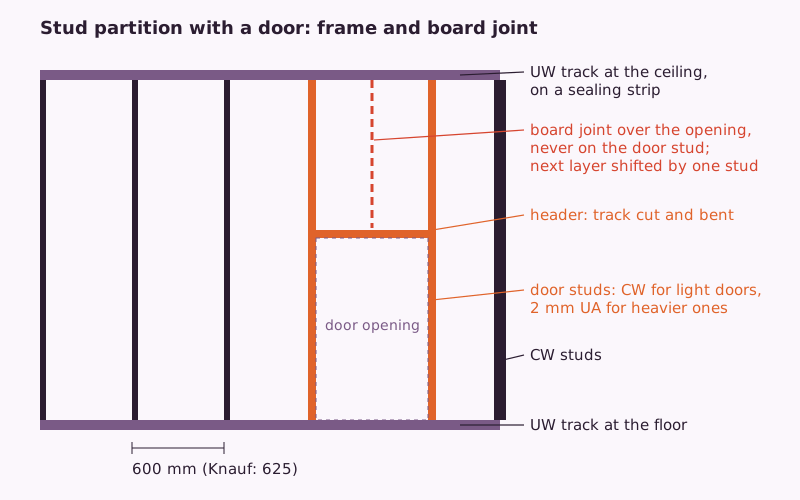
- Mark out. Snap the wall line on the floor and transfer it to the ceiling with a laser or plumb line. Mark the door openings and the stud positions along the line.
- Fix the tracks. Put a sealing strip or acoustic sealant under every track and behind the end studs. Knauf asks for this on every perimeter profile. Fix floor and ceiling tracks at 600 mm centres or closer. On tracks 102 mm and wider, Gyproc wants two staggered rows of fixings, each 25 mm in from the flange. Knauf's Swiss system allows 1000 mm on concrete for walls up to 3 m, and half that on a screed. If the floor is uneven, Gyproc puts a 38 mm timber sole plate under the track.
- Fix the end studs. Screw the first stud to the existing wall: every 600 mm in British Gypsum's guide, at least three fixings and no more than 1000 mm apart in Knauf's.
- Stand the studs. Cut each stud to a snug fit. British Gypsum wants at least 20 mm of it inside the track. Set them at 600 mm (British Gypsum, Gyproc, Siniat) or 625 mm (Knauf) so every board edge lands on a stud. If the slab above may sag 10 mm or more, Knauf uses a sliding head instead of a fixed one. Ask the building's engineer how much it moves.
- Frame the door openings. See the next section.
- Board the first side. Stand boards vertically. Long edges meet in the middle of a stud flange. Screw every 250 mm (Knauf) or 300 mm (British Gypsum), and every 200 mm at external corners (British Gypsum). Keep screws 10 mm from a paper edge and 13–15 mm from a cut edge. The screw must go at least 10 mm through the steel. Drive the head just below the paper, enough to fill over it, without tearing the paper.
- Services, blocking, insulation. Run cables through the punched holes in the studs, in conduit or with protection where they pass the steel. Knauf allows no more than two extra cut-outs per stud, and only one in a 50 mm stud. Fix socket boxes and anything heavy to the fixing channels or blocking you planned. Fit mineral wool tight, with no gaps.
- Board the second side. Shift its joints against the first side, so no joint lines up through the wall.
- Second layer, if the design has one. The inner layer takes fewer screws: Knauf 750 mm, Siniat 600 mm. The outer layer is screwed at 250 mm (Knauf) or 300 mm (Siniat), with longer screws. Its long joints are shifted by at least one stud spacing. End joints within a layer are at least 400 mm apart, and about 250 mm apart between layers. Fill the joints of the inner layer too; Knauf says the wall's fire, sound and strength figures depend on it.
- Joints. Tape and fill the outer joints and screw heads to the finish level you need.
Screws. For studs up to 0.7 mm thick, use fine-thread drywall screws (Knauf's TN): 25 mm for one 12.5 mm board, 25 then 35 mm for two layers. For 2 mm door profiles, use self-drilling screws (Knauf's TB).
Joining studs. Full-height studs are best. If you must extend one, overlap two studs by at least 500 mm for 50 mm studs, 750 mm for 75 mm and 1000 mm for 100 mm (Knauf), or 600 mm with three screws per flange (Gyproc). Stagger the joins between neighbouring studs.
#Door openings
The door takes the most punishment, so match the framing to the leaf.
| Door | Jamb studs in Knauf's system |
|---|---|
| Wall up to 2.60 m, door up to 0.90 m wide, leaf up to 25 kg | Standard CW studs |
| Any of those exceeded | 2 mm UA door profiles, full height if possible, fixed to floor and ceiling with Knauf's brackets |
How heavy a leaf the UA profile takes depends on its width. For a door up to 0.90 m wide Knauf gives 50 kg for UA50, 75 kg for UA75 and 100 kg for UA100. Up to 1.0 m the limits are the same; wider doors get lower ones.
- Header. Cut a track, bend its ends down and screw it to the jamb studs across the top of the opening. Knauf and Gyproc both build the header this way.
- Heavy doors in Gyproc's system. The jamb studs are sleeved with track for the full height of the opening, and at the bottom a piece of track is bent 300 mm up each stud and fixed with two screws each side.
- Keep the stud module. Above the header, add short studs where the 600 mm grid falls, so the boards over the door have something to land on.
- No board joint on a door stud. Knauf forbids it. Cut the board around the corner of the opening so the joint lands over the opening, away from the jamb.
- Ask the door maker. Gyproc's details say so too. Solid-core, pivot and fire doors have their own framing rules.
#What goes wrong
- Stud too narrow for the height. The wall drums and flexes, and the joints crack.
- Tracks without a seal, or fixed at full spacing on a screed instead of half. Sound leaks under the wall, and the track moves.
- A heavy door on plain studs. The jamb twists, the door drops and the corners above it crack.
- Board joints on door studs, or four board corners meeting at one point.
- Too few screws, or heads driven through the paper. The board loses grip and screw pops show through the paint.
- Both layers with joints in line. The wall is weaker and sound gets through.
- No blocking where the basin or TV goes. You find out after painting.
- Cables run through sharp cut-outs with no protection.
#How to check the work
- Stud width and board build-up match the maker's height table for your ceiling height.
- Tracks sealed, fixed at the spacing of the system, straight to the line.
- Studs vertical, at 600/625 mm (closer behind tiles), fully seated in the tracks.
- Door jambs match the door weight; header in place; door closes without catching.
- Blocking and fixing channels in place and photographed before the second side goes on.
- Insulation fills the cavity with no gaps.
- Screws at the system spacing, heads just below the paper, no torn paper.
- No joint on a door stud; joints staggered between sides and layers.
- A long straightedge sits flat on the finished wall.
#When to call a professional
Walls between flats, walls onto an escape corridor and any wall the building's fire design calls fire-rated are tested systems. Only a contractor who can show the system documents should build them, exactly as tested. For walls taller than the table, walls carrying heavy fittings, and walls with sliding or pivot doors, ask the maker's technical service or an engineer.
Draw the new wall on the plan before anyone cuts track. In Librae you can place it yourself or ask the AI assistant to move it, by voice or text, and look at the room in 3D before deciding. A contractor can suggest a different line, but the wall moves on the plan only when you approve it.
#In the UAE
- Approval comes first. In a tower the developer or community manager decides. Emaar's fact sheet bans structural works and wall removal in apartments, and the removal, relocation or covering of MEP and fire-fighting systems. Sprinklers, smoke detectors and air grilles belong to the building. If the new wall leaves one on the wrong side, only the building may move it, so mark them on the layout you submit. See developer NOC for renovation and renovation permits in Dubai.
- Fixing into the slab. Before anything is shot or drilled into the floor or ceiling slab, ask the FM which fixings and what depth they allow and whether they want the slab scanned first. Rules differ by building; get the answer in writing.
- Trakhees areas. Trakhees lets drywall partitions up to 1.8 m above the finished floor go without its permit. Anything taller counts as a full-height partition and needs Trakhees approval.
- Air conditioning. A new wall can cut a room off from its fan coil supply or return grille. Check the air path with the building's MEP engineer before you build. See fan coil units.
- Local systems. Gyproc's Middle East White Book is the only set of local height tables we could open. It dates from 2011, so ask the supplier for the current tables of the system you buy.
#What the codes say
The numbers here come from makers' system documents, not from a building code: Knauf W11.ch (Switzerland, 03.2026), Gyproc Middle East White Book (2011), the British Gypsum Site Book and a Siniat NBS specification. Studs and tracks are made to EN 14195 and boards to EN 520; see C01. In Trakhees areas, Circular No. 2 of 2025 sets the 1.8 m limit for partitions built without its permit.
This guide explains good practice and cites the documents listed below. It is not a permit, a design approval or an engineering opinion. Work on electrical, gas, fire-safety and structural elements must be carried out by licensed professionals and approved by the relevant authority.
Sources
- Knauf W11.ch Metallständerwände, system data sheet (03.2026) — Door studs and leaf weights (p. 51), no board joints on door studs (p. 53), fixing of tracks, sealing, deflection head (p. 64), splices and cut-outs (p. 67), board layout and staggering (p. 69), screws and spacing (p. 70), filling hidden joints (p. 72).
- Saint-Gobain Gyproc Middle East, The White Book, 1st edition (2011), GypWall CLASSIC — Maximum heights for 50, 70 and 100 mm studs at 600 mm (Tables 1, 2, 4, L/240 at 200 Pa), sound figures, fixing of channels, sole plate, services and fixing channels (p. 53), door details 20–22 (p. 58–60), stud splices. Dated 2014; check for a newer edition with Gyproc.
- British Gypsum Site Book, Tiling section (GypWall CLASSIC installation) — Channels at 600 mm, studs with at least 20 mm engagement, screws at 300 mm and 200 mm at external angles, 10 mm penetration, edge distances 10 and 13 mm.
- Siniat single frame partition CS70R 2×15, NBS Source specification — Studs at 600 mm, 400 mm if tiled; tracks at 600 mm; inner layer screws 600 mm, outer 300 mm.
- Trakhees Circular No. 2 of 2025, minor modification and decoration works after completion certificate — Drywall partitions up to 1.8 m above finished floor need no Trakhees permit; taller ones need Trakhees approval.
- Emaar Home Modifications fact sheet (2022) — In apartments, structural works and removal of walls, and removing, relocating or covering MEP and fire-fighting systems are not permitted.